Home About Shop Advertise
Showing posts with label Tutorials. Show all posts

November 28, 2011

Happy Birthday to One of My Rachels! And Cocoa Hand Cream


Today just happened to be the birthday of a certain now-fourteen-year-old someone who received a DVD copy of Fiddler on the Roof from her brother and sister-in-law, experienced a lovely birthday massage (not from her brother or sister-in-law), and is currently dining at the exquisite Red Lobster.

That someone is . . . drumroll . . .


The lovely Rachel Jeannine Thurston!

Now, the above ice cream cake looks very tasty, but it is lacking a festive birthday message because decorative icing apparently does not take well to very cold cake. The cluster of fourteen candles is covering up a lovely blue smoodge that would have been the 'H' of "Happy Birthday Rachel!" had things turned out differently.

Little Cousin "helping" blow out the candles . . . one of which turned out to be a trick candle!

This was actually my first ice cream cake, believe it or not. It was a layer of chocolate cake sandwiched between oodles of chocolate and vanilla ice cream. I'm not usually a huuuuuge chocolate ice cream fan, but this was quite tasty. Therefore, in honor of being acclimated into the chocolate ice cream cake club, I have decided to whip up for Rachel some cocoa-scented hand cream.


Now, the Thurston family is all about homemade gifts. Momma Thurston makes toffee, peanut brittle, and to-die-for biscotti every Christmas for all of her friends and family. Rachel loves making homemade spa treatments. Josh . . . well, I mean, Josh and I didn't make the Fiddler on the Roof DVD, but you should have seen the "custom designed" wrapping paper Josh created for the occasion.

And as for me--here is a recipe for my own personal everyday "spa treatment." Hope you had a great day, Rachel! I'll have to give you your belated present for Christmas. Enjoy the musical in the meantime.


Cocoa Hand Cream

1/4 cup cocoa powder
1/2 cup unscented baby lotion
1/2 cup petroleum jelly
1 teaspoon vanilla extract


Place the petroleum jelly in a small saucepan and melt it down on a low heat setting. It will begin to look like water as it "sweats" and reduces down.


Add the cocoa powder to the melted petroleum jelly. Blend very well. This will look a bit like thick hot chocolate. Add the vanilla. Turn off the heat and let the temperature of the mixture go down.


Add the lotion. MAKE SURE IT IS UNSCENTED OR THE FINAL PRODUCT WILL REEK. I found this out the hard way. This will not combine very well initially.

Doesn't look very appealing just yet

If you keep stirring, you will eventually end up with a smooth and almost-appetizing-looking substance. Let this cool a little bit, but it can only thicken slightly or it will be too firm to pour into whatever container you would like to use for your hand cream. I used a Relic watch tin.


Pour the mixture into the container you will be using and pop it into the fridge. Allow to sit for about a half an hour.


Apply a cool dab to your hands and rub it in nice and smooth :-). You can see my fingertip "dimple" in the photo of the cream near the top of the recipe. This lotion goes on pretty greasy like any body butter, but if you keep rubbing it in it just becomes nice and nourishing for your skin . . . P.S. it smells super yummy.


As for my other sister, Rachel . . . have no fear. She did not have another birthday and is still eighteen. Yikes!

November 8, 2011

Pumpkin Cupcakes


I've been really bummed lately by how few desserts are available to me since I'm not supposed to eat fruit, chocolate, and most nuts. Well, guess what? Pumpkin, the king of fall food staples, IS A VEGETABLE!

Not only is the following recipe completely IC-safe, this is perhaps literally the easiest and most delicious fall treat you will ever make. It requires two ingredients--four if you want the cream cheese frosting (which you do, I guarantee).


I got this earth-shattering idea from Sweet Verbena who got it from Big Red Kitchen. Gotta love the blogger community.

Pumpkin Cupcakes

1 box cake mix
1 (15oz) can pumpkin pie filling

1 block cream cheese
2 cups powdered sugar
optional: 1 tsp vanilla extract


Combine the pumpkin pie filling and cake mix. This will take some serious blending since the pumpkin is the only liquid going into the mixture. Blend thoroughly, crushing any powdery lumps, until a nice thick batter is formed.

Best thing about this batter? No raw eggs, so you can eat as much as you want without fear of salmonella! Josh took full advantage of this perk.


Grease muffin tins and fill them generously. These cupcakes will expand a lot in the oven, but they will settle again, becoming very dense, moist, and reasonably sized. Of course, you have to bake them first. try 350 degrees for 20-25 minutes for regular cake batter and 25-30 minutes for the extra moist variety. In all honesty, I would not recommend extra moist cake mix, as this recipe lends itself towards very moist cupcakes by nature.


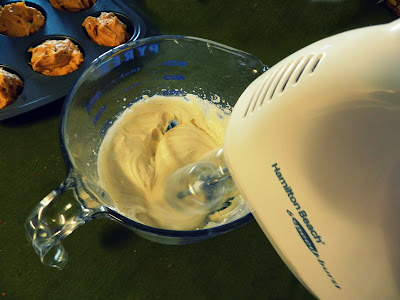
While your niblets of yumminess bake, blend together the cream cheese and powdered sugar to make an easy and delicious frosting.

Final step: Accept your friend's offer to come over after the play he wrote and directed which you and your husband were in to frost the cupcakes for you. Be sure to give him one for himself and one to take to his girlfriend. Oh wait, this doesn't apply to you? You don't have a Greg Coles offering to ice your baked goods for you?

Alas, how sad I am for you ;-)

November 6, 2011

The Art of Shortcuts: Operation Suit Salvation


These are Josh's dress pants. They are the only pair he owns, and they accompany a black jacket to form the only suit he owns. When the director of "Voices," Josh's debut play in the One-Act Festival, agreed to let him wear a black suit instead of the obnoxious black mumu trenchcoat, we were all over the idea. Unfortunately, Josh's pants had gotten into some mischief in the laundry. Sure, they look fine now, but this is what they looked like just over a week ago.


The marks looked like a cross between squiggly water stains and somebody dragging a white eyeliner pencil across the fabric. Because the stains were white, we had to assume that they were caused by bleach, but we had no explanation for the odd shape and the fact that we hadn't found similar stains on any other items of clothing.

Whatever the cause, I would get frustrated every time Josh wore the marred pants to a dress rehearsal. He insisted that no one could see the stains, but from the audience, I knew that they lessened the impact of what was meant to be a very strong character.


In a stroke of genius, I mixed a few drops of black Rit Dye with about a tablespoon of water, making a small amount of diluted dye solution. I then used my craft brush, which began as a pale straw color and is now dark brown, to paint over the white spots.

At first I was a little nervous because the dye showed up much darker than the black of the pants; however, when it dried, it was completely undetectable!

I'm so excited for this new trick I've learned for preserving black clothing. Josh can get another couple years' use out of these pants . . . and he looked schmexy in the play ;-)

October 19, 2011

The Art of Shortcuts: Boil the Perfect Egg


I know, this is literally the first thing they teach you how to do in cooking class; however, being taught to boil an egg has nothing to do with whether or not you can boil an egg well.

I am fortunate enough to have just recently discovered the magic combination of old wives' tales and culinary science to create the ultimate delicious hard-boiled egg. Unfortunately for you, I could not bear to let you all go on with your lives unawares. Mwahahaha! You are now subject to my lecturing!

But here are some reasons you should listen to my worldly wisdom.

These eggs will:
  • Turn out perfectly smooth and round regardless of cracks during cooking
  • Taste fresh and flavorful for days (if they last that long. Nom!)
  • Be firm to the bite, yet soft and moist instead of dry and sticky
  • Come out of their shells so easily you'll think you did something wrong
    Here's what to do:
    1. Optional: Buy your eggs about a week before you are planning on hard-boiling them. Believe it or not, fresh eggs do not come out of their shells well no matter what.
    2. Place the eggs in the pot you are going to cook them in and cover them completely with water to make sure you have enough (water, that is.) Then remove eggs and set them aside on a paper towel.
    3. Add a pinch of salt to the water and boil completely before adding any eggs. I used to fall into the temptation of adding my eggs to the room temperature water and then turning on the heat so that I could go about my business and not have to come back in a few minutes to add anything. This will, of course, completely ruin your cooking time.
    4. Add a tiny amount of vinegar to the boiling water. I'm talking barely a teaspoon. This will keep the whites from leaking out of the shells and forming weird shapes if your eggs get cracked at all while being dropped into the pan.
    5. Add your eggs to the boiling water and leave on high heat for 12-15 minutes. I've found that 13 minutes is perfect for Josh and I.
    6. Strain eggs and run cold water over them for a full minute, then place them in a container of cold water and let eggs stand for a few minutes.
    As you can see, these little nuggets of loveliness have perfect, golden yellow, opaque yolks. Let me tell you, they are just bursting with flavor, and they feel so good to sink your teeth into. So moist and yummy!

    These could make a great egg salad or addition to a greens-based salad. Or you could do what I do and just sprinkle with a dab of salt and munch away like a little piggy. Although, I'm pretty sure pigs don't eat eggs.


    Who am I kidding? Pigs eat anything.

    ShareThis